My son somehow found out about Mega Shark. It is this huge, sci-fi shark that can destroy anything. That meant -for his birthday - he wanted a shark cake. I did a lot of research on Pinterest, and looked at all the shark cakes I could find. After many sleepless nights obsessing about it, I decided I wanted to make the entire shark out of cake. Then, to add to the challenge, I wanted to use buttercream and not fondant. That way, the kids could eat the cake without having to remove the fondant. I tried to take pictures at each step during the process, so maybe it would make it easier if you also decided to take on this challenge.
The first thing I did was make a template for the shark. I decided on using a 12 x 12 square cake as the base. That meant the shark would need to fit on that cake. I just used a regular 8 1/2" by 11" piece of paper.
The first thing I did was make a template for the shark. I decided on using a 12 x 12 square cake as the base. That meant the shark would need to fit on that cake. I just used a regular 8 1/2" by 11" piece of paper.
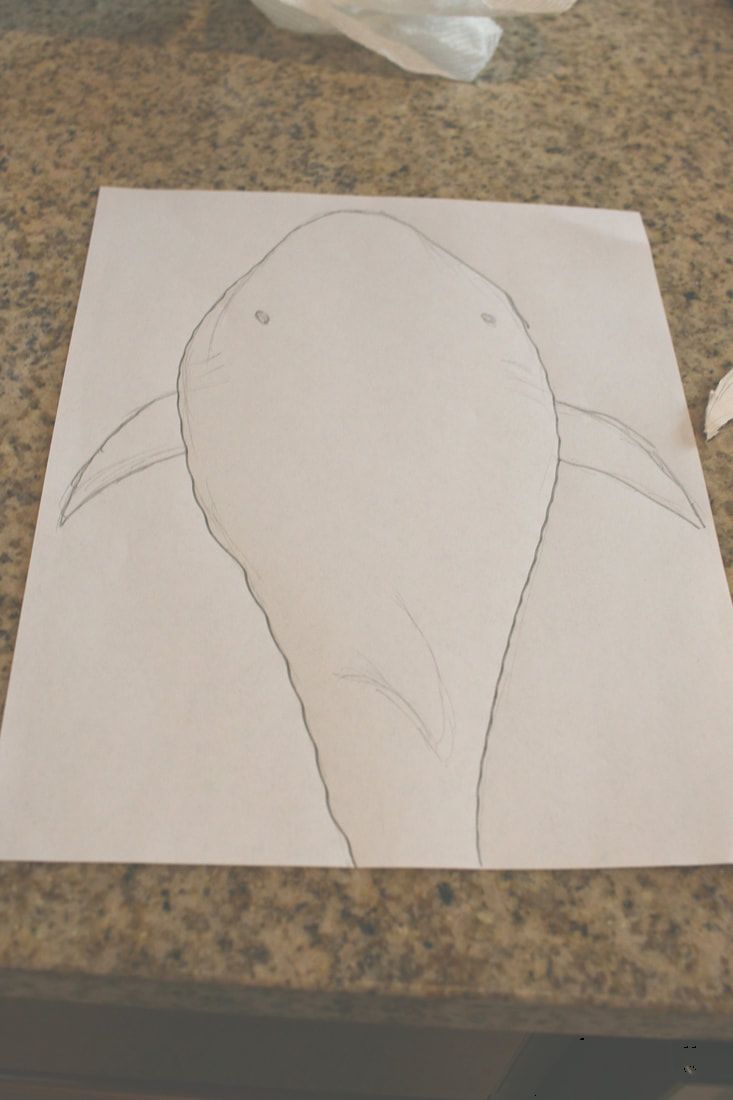
I made the template on paper, then traced it onto a cake board, and cut it out. It had to go diagonally across the 12x12 square cake (in the foil).


I did not include room for the shark's back fin in the template. I knew I was going to need to put the fin into the cake to make it more stable.
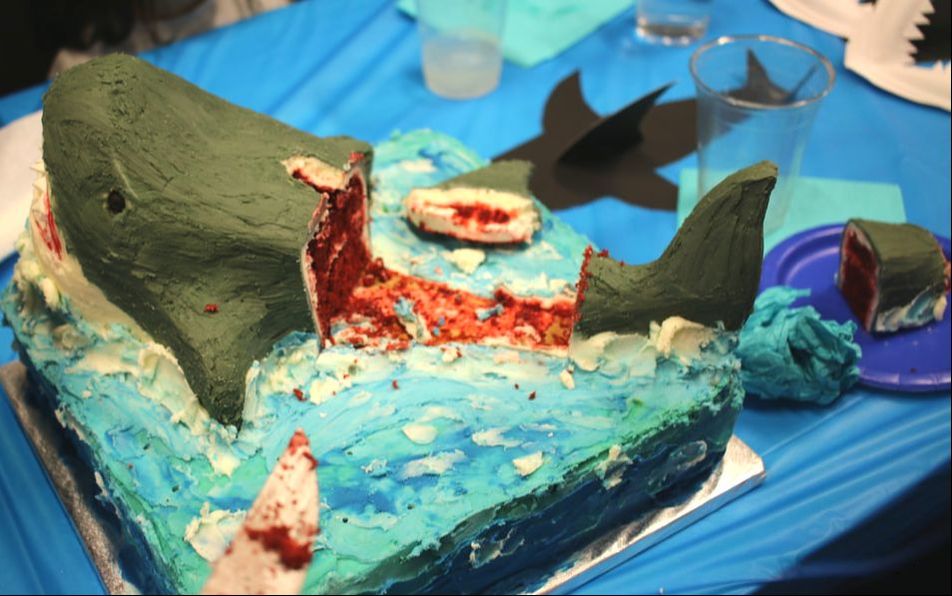
For the shark part of the cake - I knew I wanted to use red velvet. The scene in the movie, Steel Magnolias, when they "hacked" into the armadillo cake has always stuck with me. What would be a better time to use red velvet than when you cut into a shark cake?
For the shark part of the cake - I knew I wanted to use red velvet. The scene in the movie, Steel Magnolias, when they "hacked" into the armadillo cake has always stuck with me. What would be a better time to use red velvet than when you cut into a shark cake?
Now, I must give you some warning. I baked two 12 x 12 square cakes for the shark. After I cut out my two sharks, there was a lot of cake left over. The great news is that if you have 3 kids, they can take care of a lot of that left over.


I wanted to make shark's mouth open, so all of this teeth would show. To do that, you use layers to build up the snout.


I did remove the top layer of the cake for the bottom of the mouth. I also removed the top layer for the side (pectoral) fins of the shark. Now, you have to use some sculpting to round out the body and fins of the shark.
Next, it was time to do the crumb coat of the cake. You have to seal in all that red cake so there is that big surprise moment when you cut into it.
Next, it was time to do the crumb coat of the cake. You have to seal in all that red cake so there is that big surprise moment when you cut into it.


At this point, I started to freak out a little bit. To me, it looked more like a whale, than a shark. I was not sure if I was going to be able to make it look like the mean creature my son wanted.
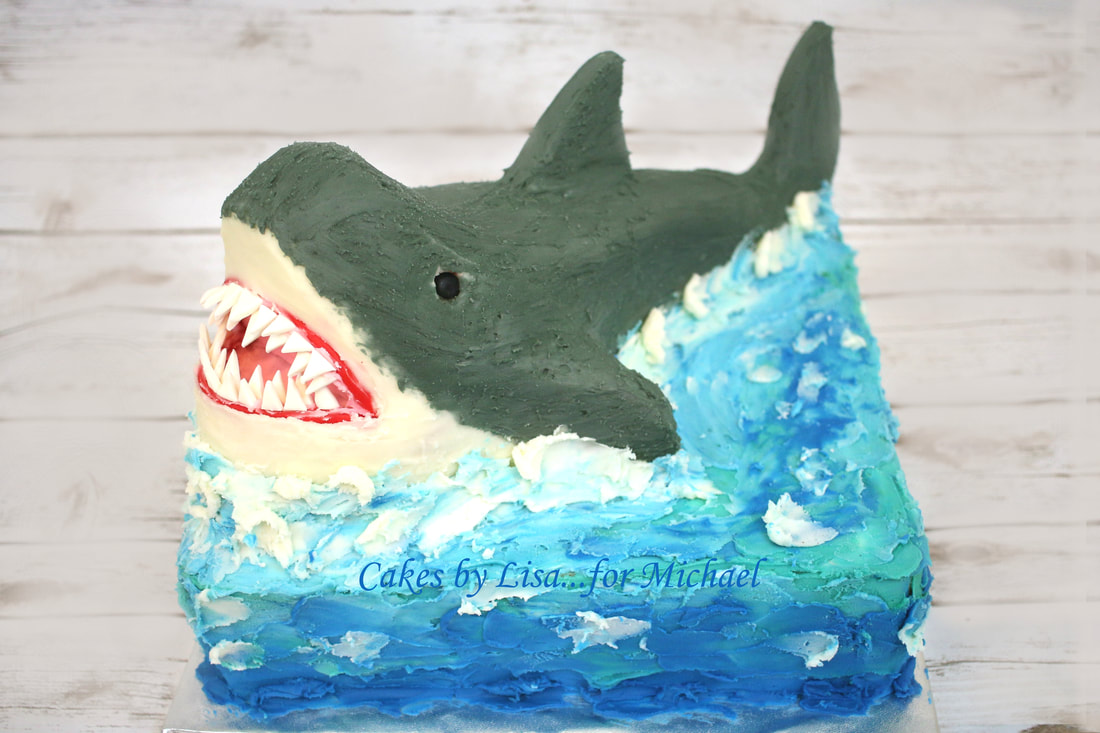
I knew that the dorsal fin and the tail (caudal) fin were really important to make this look like the meat eating predator it is. To make these fins, I used modeling chocolate. It is really forgiving, and you can use the warmth of your hands to mold it however you want. For the dorsal fin, I cut out a piece of the cake so I could insert it. Again, I was wanting to make it more stable. Nothing would be worse than the fin falling over during transit. I also added a second crumb coat to keep those cake pieces sealed inside.
I knew that the dorsal fin and the tail (caudal) fin were really important to make this look like the meat eating predator it is. To make these fins, I used modeling chocolate. It is really forgiving, and you can use the warmth of your hands to mold it however you want. For the dorsal fin, I cut out a piece of the cake so I could insert it. Again, I was wanting to make it more stable. Nothing would be worse than the fin falling over during transit. I also added a second crumb coat to keep those cake pieces sealed inside.


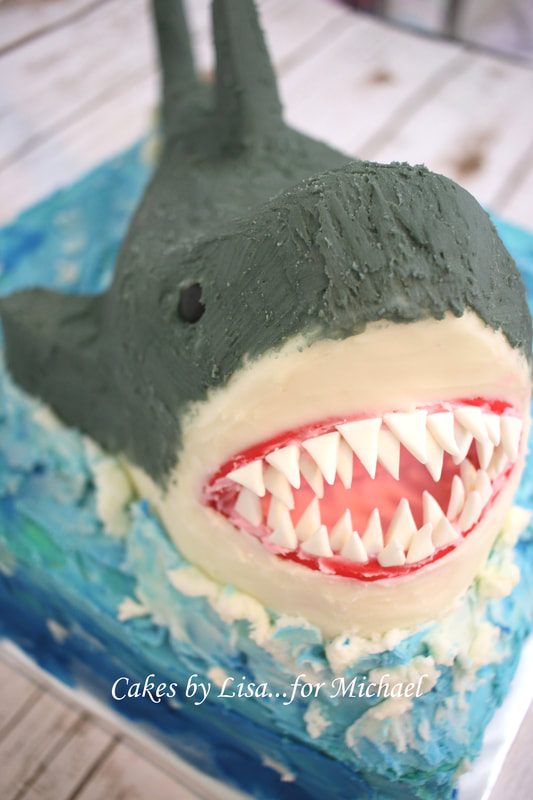
The most feared part of the shark - the mouth and all those teeth: I used fondant to make those dreaded, sharp teeth. I rolled out the red fondant to frame the mouth and show the gums of the shark. To attach the teeth, I made some pink icing. I used that on the inside of the mouth and as my glue. I put it on over the red gums and began placing the teeth in two rows. This guy is starting to look a little scary!


The next task is to find a way to make the shark's eyes as cold and dark as they look on tv. I used black fondant for that. The most important thing is to make a hole for the eyes. Do not just put the fondant eyes on the cake. You have to put the eyes in the cake. I used my ball tool to make the perfect size. You just push it into the cake to make the hole. Then, you take the black fondant eyeballs and place them.


I was finally able to move my shark board onto my 2-layer 12x12 yellow cake. To attach the caudal fin, I just used more icing as glue.


At this point, I began to make the water look on the bottom layer. I used different variations of blue with white for this effect.


The shark is now ready for it's final coat of icing. I tinted it grey for the top and used white for the bottom half. I thinned out the icing with some milk so I could "paint" it on. It gave it a texture that I really liked.


The final step is to add icing around the shark so it looks like he is coming out of the water.


After all of the time spent on making the cake, it is only worth it if my son is happy. He had already gone to bed by the time I finished it. ( We all know that the best time to make a cake is when everyone else is asleep.) In the morning, I let him see his shark. The smile on his face was all I needed. That smile is better than anything else in the world. Once I got his approval, I was able to take a deep breath and be proud of what I made. It was all worth it!!!
Here's a picture of how awesome it looked when we cut into the cake. All the kids at the party gasped when we cut it open. It was exactly what I was hoping for!
 RSS Feed
